Once again Steve and I faced each other across the gaming table in a game of Napoleon at War. I'd built a Prussian army for the Leipzig game but it didn't get to see much action so we decided to give it a debut in a pick up game. So Steve fielded a 1500pt French Infantry Division and I had my 1500pt Prussians Infantry Division. We again used the 100 days campaign book for the lists. My list ended up being 10 points over ( as a mix up meant I'd used the Prussian download list) which Steve, very graciously, accepted. The Prussian figures are mix of manufacturers many painted by me, most bought off e-bay.
We rolled a 2 for the scenario. This means "Flank Attack". Both forces start with half their forces on table (rounded up) and the rest come on as reserves. The attackers reserves come on from a flank of his choice. Once decided all reserves arrive on the same flank. The attacker starts rolling for reserves from turn 1. The defender only starts rolling for reserves once the attacker has received reserves. The side with more Victory points than the opponent has active forces wins the game. This usually works out to be an interesting encounter.
We rolled to see who was to attack (as both armies had the same aggression) and I rolled highest so I attacked. Steve rolled a 2 for terrain so we had 5 pieces of terrain. Amazingly 4 out of 5 ended up being hills, the fifth was an enclosed field.
Setup
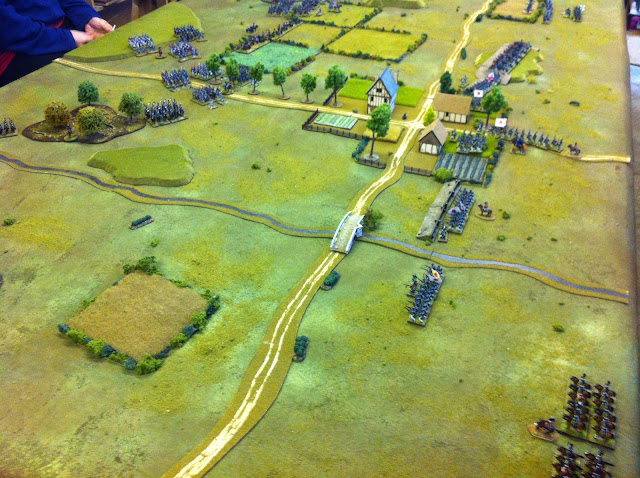
The table was set up each dicing for, then placing a terrain piece in turn and we ended up with the layout as below. The flat square fields were just for show as the table looked a bit monotonous with all those hills.
Steve selected the stable edge on the far side and we placed the objectives.
Then Steve deployed his French (half of the forces). On table was
1 French infantry brigade = 1 line battalion and 4 Conscript battalions.
1 Light Cavalry brigade = 2 Lancer Regiments
1 Heavy Artillery battery.
French reserves were unknown at this time.
As for the Prussians, they started with,
1 Prussian 1st to 12th Infantry Regiment = 2 Musketeers battalions and 1 fusilier battalion.
1 Landwehr Regiment = 3 Landwehr battalions.
1 Medium Foot Battery.
As reserves I had
1 Cavalry Brigade = 1 Hussar regiment, 1 Dragoon regiment and 1 Uhlan regiment.
1 Prussian Infantry regiment = 2 Musketeers battalions and 1 fusilier battalion.
1 Prussian Jäger Battalion.
I had made a gamble when compiling my list in that the Prussian Cavalry were purchased as a reserve so they couldn't start on table. I was praying I'd get some reserves early. My over all plan was to use the quality Prussian infantry to thrust down my right wing and use the Landwehr to advance on the left. The presence of French cavalry from the start was going to be problematic unless I got reserves on early.
Turn1
I advanced as per the plan.
The French straightened their line of infantry and brought their cavalry forward a little to threaten my infantry (I was lucky they didn't charge in).
Turn 2
The cavalry threat was too great so my outer infantry battalion played safe and went to square, I deployed the other unit to line for greater fire power.
On the left I advanced further to threaten with the Landwehr. They were up against conscripts so I thought it was a reasonably even match.
A rush of blood saw me charge with the Landwehr just to show I meant business.
But they were repulsed by defensive fire. My Landwehr in the middle were getting shredded by the French Heavy artillery but sadly for them, that was their job! To keep the guns occupied.
Annoyingly my reserves failed to arrive ... ugh!!!!
The French weren't going to simply sit their and so after some effective firing (unusual for conscripts) they moved around to threaten the Landwehr.
On the Prussian right the French line battalion engaged in a firefight. In Napoleon at War a nice feature is the conept of 'Firefights'. If an infantry battalion doesn't move and fires at full effect (meaning it will not charge), and the target unit can return fire, then a 'Firefight ' ensues. Who ever inflicts the most casualties wins and the loser has to fall back. In this case it was the French who were forced to retire.
Back on the Prussian left the French also were lusting for blood and charged the Landwehr but they too were repulsed.
The situation at the end of turn 2. I need reserves!!!
Turn 3
The French lancers were standing menacingly in front of my quality Prussian infantry on the right flank thwarting my advance. I was beginning to regret my decision not to have cavalry on from the start!
As far as movement goes I couldn't really do much. My Landwehr were beginning to look a bit thin on the ground.
And then..... Oh yes, Reserves at last!!! I get 1 force on as a reserve and it doesn't take a genius to guess what arrived. The Prussian Cavalry have to be a bit wary as they know the Lancers will react quickly to their arrival.
On the Prussian left the Landwehr now took a pasting! The heavy artillery destroy their target and the French infantry charge the now weakened Landwehr to their front and........
The Landwehr brigade breaks!!!!! The whole Prussian left flank is has gone! The French earn themselves a Victory point. I guess i was asking too much of the poor Landwehr.
As predicted the Lancers launch themselves at the Prussian cavalry.
But in a decisive moment both Lancer regiments fail to break thier targets and fall back.
However, the French now recieve their reserves. Another brigade of 5 infantry battalions and a Heavy cavalry brigade of 2 Dragoon regiments.
Turn 4
The clock is ticking and the French reserves mean there will be no quick victory. The Prussian Hussars charge the rear of one of the French Lancer regiments destroying it with ease so breaking the brigade. Then the Prussian Dragoons charge the French line battalion (which did not form square!) and after destroying them broke through on to the other Infantry battalion holding the objective and again the infantry were wiped out.
To add to the French misery the rest of the Prussian reserves arrive...hooray!!
Much like the last game the whole axis of the battle suddenly switches. The reserves now make up the Prussian right flank and what was the center is now the Prussian left flank. With the destruction of the French Light cavalry brigade and the capture of the objective the Prussians now have 2 Victory points, but the French still have 4 active forces on table.

The French now pull off a surprise move which take the Prussians by surprise. The French artillery remains silent and in the charge phase the French Dragoons charge through their own guns and straight into the Prussian infantry!
They also cunningly avoid any possible countercharge from the Prussian Dragoons.
Caught totally by surprise the Infantry opt to try and shoot out the Cavalry and splendidly hold firm to inflict 6 hits!! (The star on the dice is a 6). OUCH!!!!
In suffering a casualty the Cavalry are forced to take an unfavourable élan test which.....they pass with ease. Uh oh!
But the cavalry make a hash of it and only get 3 hits on the infantry. The Prussian Infantry pass thier morale test! And inflict another casualty on the cavalry. The Infantry lose the melee but importantly they survive!
Interestingly, the Dragoons opt not to breakthrough on the infantry unit behind and decide to fall back through the guns. With such heavy losses the cavalry feared getting destroyed which would break their brigade. The French Cavalry brigades are restricted to 2 units only and so prove to be very brittle.
The French cover their own right flank with the remains of their first infantry brigade. Despite the Prussian success on turn 4 I feel the game slipping away from me. There is a lot of ground to cover and the French have done a good job aggressively defending their position. In this scenario there are no draws. If the attackers fail to break the defenders they lose and the defenders win.
Then I see a slim chance of victory. Charge the guns!! If successful a break through charge would hit the still retiring dragoons. But no sooner do I move the cavalry I realise the artillery can evade and sure enough the crew take refuge in the near by infantry battalion thus denying the cavalry a target and also any chance of a break through move. Oh well!!!!!
The French now sense their own opportunity. Their full strength Dragoon regiment moves up to charge range and the retiring Dragoon regiment about face.
The full strength French Dragoons strike at the Prussian Dragoons but ........
the Prussian Hussars heroically hit back with a counter charge!
Heroic maybe, but they totally fail to make any impact in melee and actually come close to getting themselves destroyed! Light cavalry don't really match up well to the Heavy Battle Cavalry.
The French Dragoons now breakthrough onto their original target and make short work of them.
With the success of their comrades the other dragoon brigade now see a chance to break the Prussian Cavalry brigade and hurls itself at the Prussian Uhlans. Success would probably win them the game as there was too little time left for the Prussian infantry to catch the French and so the Prussian cavalry was the only way the Prussians could possibly gain any further successes.
But..... the Dragoons fail to make any hits and the Uhlans fight back and destroy the Dragoon regiment! A third Victory point for the Prussians.
And so, with just won turn left, the French have left the door open for a Prussian victory.
Turn 6
There is no chance of the Prussian infantry catching the French now. Although broken, the French Cavalry passed their 'force morale tests' and this fact meant that there was still French Cavalry on table stopping the Prussian infantry from advancing too far.
And so it fell to the Prussian Cavalry to win the day. The Prussian Uhlans ( with only 2 bases left) were the only remaining unit that could launch a game winning attack. The French infantry unit containing the Artillery crew were forced to stay close to the guns or lose the battery, and so the game. In their turn 5 they moved as far back as possible but the Prussian artillery had them in their sights and so they were unable to make a support move. If they had stayed in place and formed square they would have been within reach of the Prussian Infantry.
This meant that the infantry were facing away from the cavalry and were within range of a charge.
The Prussian artillery inflicted a hit on the infantry before the Uhlans charged in. The Uhlans smashed in to the rear but only caused 2 hits on the Infantry, not enough to wipe them out, but it did force them to retreat.
But Cavalry get a breakthrough charge and so chase down the running infantry destroying them and the artillery crew. The Uhlans are also destroyed in the process giving the French another victory point but their selfless act of heroism wins another 2 Victory points for the Prussians. The destruction of the infantry unit means the French infantry brigade is broken and the French Heavy artillery are destroyed. The only French active force on the table is their Infantry that had come on as reserve. So victory was secured for the Prussians.
Conclusion
The Prussians win a victory with a total of 5 Victory points. (Equivalent of 30 Glory points).
The French gained 2 Victory points. (Equivalent of 9 Glory points).
It was another close game. The French defended with aggression which is often a good tactic as it suits their characteristics. They may be got too aggressive in the end and perhaps if they had played more defensively in turn 5 they could have closed out the game. Steve had contemplated pulling right back on his turn 5 but felt ashamed at abandoning the guns, to quote "the boss wouldn't be too happy if the 12 pounders were left behind!"
This battle highlighted a lot of subtle nuances in the Napoleon at War system. List selection, what to have as reserves when organising your force, what to leave off table when the scenario demands can all be key factors. Sometimes a gamble pays off, sometimes your left high and dry. Although quite late in arriving (considering my plan centered around an early arrival) paying less for my Cavalry to be a reserve payed off in the end. Steve had built his French army for aggression and so was hoping to be the attacker, he was slightly caught out when he ended up as defender.
Again, we both had a great time.