It's been a while since my last post. This is primarily because I started a new job which has meant a bit less time for such frivolities! I have been playing a lot, but the blogging has taken the hit. Hopefully, now I'm a bit more settled I should get back to my not so prolific usual.
I've been doing a bit of experimenting with things lately. A lack of any new publications from Man at War has meant I have had to resort to a lot of DIY with regard the rule set. I've been looking at coming up with my own lists for various campaigns, mostly relying on Nafziger and his enormous collection of OOBs. Still very much a work in progress.
I've also been looking at new pick up scenarios. Having played the game for quite some time now repeatedly playing the same 6 scenarios in the rule book has left my friends and I fancying something new.
I picked up the Warhammer Waterloo rule book a while ago when it was being sold off cheap at Salute. That rule set contains a good number of scenarios which, with modification, could be used for a number of different rule sets.
The first scenario we had a go at was King of the Hill. In essence the game is based on the occupation of a hill placed in the center of the battlefield.
My friends Chris (French) and Steve (Austian) faced each other across battlefield.
The aim of the game was to occupy the hill in the centre of the battle field. To occupy the hill you needed to have double the the amount of units fully on the hill than your opponent. The objective (the hill) only becomes live at the start of turn 4. In Napoleon at war you assess victory conditions at the start of each players turn. If at the end of the game no side has double the units on the hill then the side with the majority of units on the hill would win.
When setting up the game it was typical that the players rolled up a lot of hills. 5 extra terrain pieces were placed and 3 of those were hills!. The other 2 pieces were an enclosed field and an ordinary field.

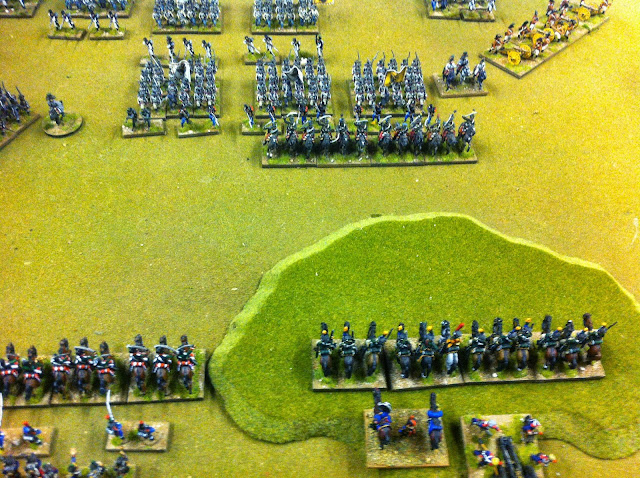
The French formed up placing their artillery limbered in the centre in between 2 small infantry brigades.

The cavalry brigade was spread out in support of the infantry.

The Austrians focused their deployment on the hill and massed their infantry made up of Jagers and Grenzers as well as German infantry.

The Austrians only had 1 cavalry unit on table so were initially relying on their infantry to do the job.

However, the cavalry they did have was a quality Hussar regiment.

Turn 1
As attackers the French lost no time attempting to secure the enclosed field on their left.

They also occupied the hill with a regiment of Chasseurs.

And advanced on their right flanking the hill with cavalry.

The French position at the end of their turn 1.

The Austrian response was to advance on the enclosed field with their light infantry.

and advanced up to the hill.
The Austrian artillery menaced the French (Bavarian) cavalry

and the Austrian hussars charged on to the hill to engage the French Chasseurs.

It was a poor match and the Chasseurs were forced to retire.

This allowed the Hussars to break through on to the still limbered French artillery.

Needless to say the Hussars dispatched the artillery and gained sole possession of the hill.

The Austrian position at the end of turn 1.

Turn 2
Concerned by the success of the Austrian Hussars the French infantry on their left formed square while the other unit secured the enclosed field.

In a bold move the French infantry deployed in to line to shoot at the Hussars. The infantry opened fire and the Hussars failed to evade. As a result the Hussars lost more casualties.

On their right the Light cavalry moved out wide looking to out flank the Austrian artillery.

On the left the Light cavalry moved up to halt the Austrian infantry. They charged ....

But rapidly lost their nerve when the infantry opened up with defensive fire.

The French Chasseurs reformed and tried their luck once more against the now depleted Austrian Hussars.

Again the quality of the Hussars shone through and the Chasseurs were forced to fall back. But in so doing the Hussars, with so many casualties, were so reduced in strength they were removed from play.

The situation on the French left at the end of their turn 2

Situation on their right.

With the loss of their Cavalry it was all down to the Austrian Infantry which were forced to maintain their advance despite the presence of the French Cavalry.

Infantry advanced up to the hill,

and attempted to gain the enclosed field. The Jagers charged but were forced back through weight of defensive fire.

The Grenzers had a go but were also forced to fall back.

The French doggedly held their position.

Overall situation at the end of turn 2. Note the Austrians managed to gain a foot hold on the hill.

Aware that the hill objective went 'live' at the start of the next turn focus swiftly switched to the hill.

The French infantry (and depleted cavalry) moved on the hill but only 1 unit could actually fully get on to the hill (the unit in line).

On the French right their units moved to encircle the Austrian artillery.

The infantry charged the guns, not quite achieving a flank charge....

and were forced to retire from all the canister fired at them.

The cavalry decided to have a go. Buoyed by their success against the infantry the artillery relied on their canister fire to see off the charge as the cavalry , like the infantry the, failed to gain a flank charge.

The artillery opened up on the cavalry and inflicted casualties on the light cavalry. This meant the cavalry would need have to perform an unfavourable élan test to charge home. They needed 2x4+ and passes the test with ease.

The artillery were destroyed

The cavalry broke through on to an awaiting infantry square but failed to make an impact on the infantry.

Around the hill a French column assaulted and Austrian column

and forced the Austrians to fall back.

On the left the cavalry tried once more to charge the infantry but again were forced back by defensive fire.

The Austrian Infantry were beginning to log jam behind the hill as the French began to encircled them.

But luck favoured the Austrians. The Austrian column on the hill engaged the French line in a firefight which French, despite being in a better formation lost! As a result they were forced to fall back.

The Jagers assaulted once more in to the enclosed field and forced out the defending French.

Suddenly the situation had had swung in favour of the Austrians.

To add insult to injury the Austrian reserve arrived, a brigade of Cuirassiers.

These moved to encircle the French right flank.

And so at the end of turn 3 the Austrains had sole possession of the hill as a result of a single fire fight. Obviously this meant that at the start of turn 4 the Austrians had won the game.

The point of the scenario was to force both side to advance and meet in the middle of the table and engage in a good old ding dong fight. I feel it achieved that. Many Napoleon at war scenarios allow the defender to just sit back and force the attacker to to do all the work. That's ok but it's good to have scenarios where both sides are forced to fight.
However the scenario does need a few tweaks.
Firstly the hill I used was far too small. It was only big enough for a few units to occupy it. This meant much of the fighting occurs around the hill and not on it and allows situations like what happened in this game to occur.
I have since tried the scenario with a bigger hill and it works much better. Also I just felt its better if the objective hill is the only hill on the battlefield, thus making it a clear focus of attention for a commander to occupy.
Secondly having a fixed time at which the hill 'goes live' creates some issue. In our second game (with the bigger hill) it was too easy to hold units off the hill but behind the hill for cover. And then just swamp the hill on turn 3 knowing that was the critical turn to have units on the hill. This is could be overcome by having the turn the hill 'goes live' determined randomly or simply left to the end of turn 6.
Despite the flaws in the scenario we had an enjoyable evening.
Hope you enjoyed the write up and many thanks for reading :-)
Always enjoy N@W AARs and liked your scenario ideas.
ReplyDeleteNice write up! designing scenarios that are fun and challenging si never easy!
ReplyDeleteTamil Nadu Board which Conducts the Examination of Plus Two in Month of March. Supplementary Examination Conducts in month of Jun. TN HSC Question Paper 2021 TN DGE board Annually and Private and Regular Students Participate in Plus One & Plus Two Examination every year more than laks of students.
ReplyDelete